Signing Android packages with apksigner
Overview
Android requires that all Android Package Kits (APKs) be digitally signed with a certificate before they are installed on a device or updated. The apksigner tool, available as part of the Android SDK Build Tools, lets you sign APKs and confirm that an APK's signature will be verified successfully on all versions of the Android platform supported by that APK.
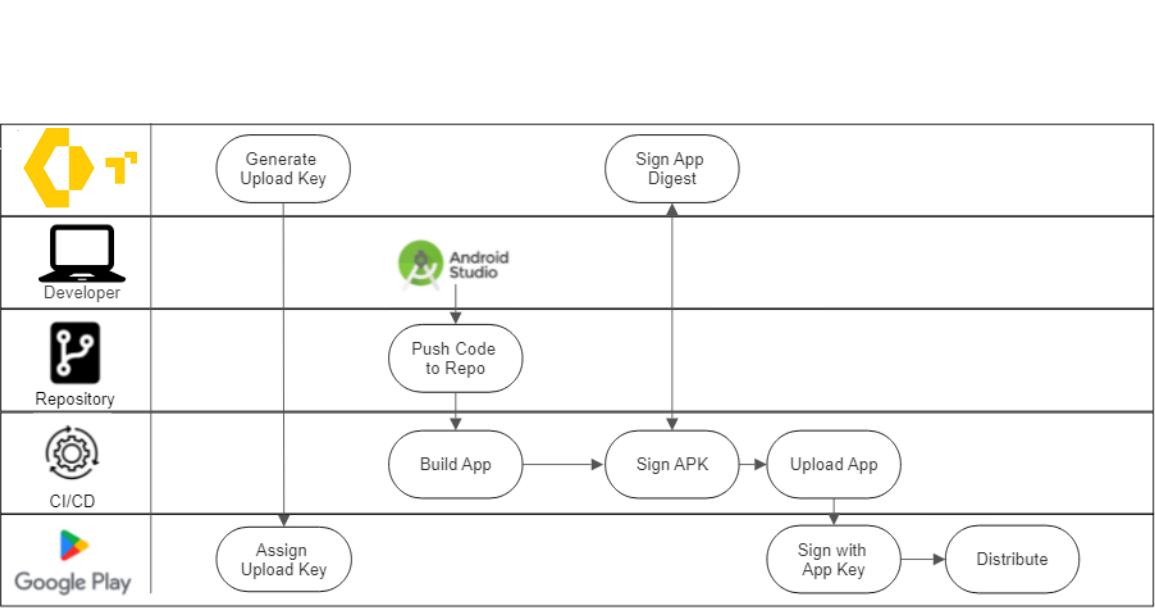
Since Android packages are based on the Java framework, you can use apksigner and a PKCS#11 integration with Next-Gen Trust Security (NGTS) to sign your applications. The diagram below shows how the Google Play signing workflow integrates with NGTS.
Before you begin
Before proceeding, ensure you have the following:
- A build/developer system
- The Code Sign Client installed
- The apksigner CLI (part of Android Studio and Android SDK Build Tools)
How do I get started?
The PKCS#11 integration will fail on modern systems without the following configuration.
-
Set Java VM options for modern JDKs (Java 9+) — Modern JDKs hide the PKCS#11 provider by default. You must set an environment variable to expose it before running
apksigner.For PowerShell:
$env:_JAVA_OPTIONS = "--add-opens=jdk.crypto.cryptoki/sun.security.pkcs11=ALL-UNNAMED"For Windows CMD:
set _JAVA_OPTIONS=--add-opens=jdk.crypto.cryptoki/sun.security.pkcs11=ALL-UNNAMEDFor Linux/macOS (Bash/Zsh):
export _JAVA_OPTIONS="--add-opens=jdk.crypto.cryptoki/sun.security.pkcs11=ALL-UNNAMED" -
Add client binaries to the system PATH (portable package) — If using the portable package, the PKCS#11 driver has dependencies that must be discoverable. Add the client's
binandlib(orPKCS11on Windows) directories to yourPATH.For Windows CMD (example):
set PATH=%PATH%;C:\path\to\codesign-client\bin;C:\path\to\codesign-client\PKCS11For Linux/macOS (example):
export PATH=$PATH:/path/to/codesign-client/bin:/path/to/codesign-client/lib
The integration process involves three main steps:
- Create a PKCS#11 configuration file — a text file that tells the Java security provider where to find the PKCS#11 library.
- Find your Signing Key's label — list the available keys to find the correct label.
- Sign the APK file — run the apksigner command, pointing it to your configuration file and specifying the key.
Step 1: Create a PKCS#11 configuration file
The Java security provider that apksigner uses needs to know how to communicate with the Code Sign Client. Create a new text file (for example, venafipkcs11.conf) and add the following, ensuring the library path is correct for your operating system:
name = VenafiPKCS11
library ="/opt/venafi/codesign/lib/venafipkcs11.so"
slot = 0
Step 2: Find your Signing Key's label
To sign your package, you need to provide apksigner with the label of the key you wish to use.
Run pkcs11config list to list the Signing Keys that are available. For the one you want to sign with, copy the Label value.
Step 3: Sign the APK file
Now you can run the apksigner sign command to sign your Android package. Pass the label value from the previous step in the --ks-key-alias argument.
apksigner sign \
  --ks NONE \
  --ks-pass pass:ignoreme \
  --provider-class sun.security.pkcs11.SunPKCS11 \
  --provider-arg ~/venafipkcs11.conf \
  --ks-type PKCS11 \
  --ks-key-alias <Label> ~/test.apk
Replace ~/test.apk with the path to your Android package file.
What's next
After your APK is successfully signed, you can proceed with the standard Google Play Console workflow:
- Upload the signed APK to the Google Play Console.
- Assign the upload key to your developer account.
- Generate the app signing key.
- Create a release and distribute your application.